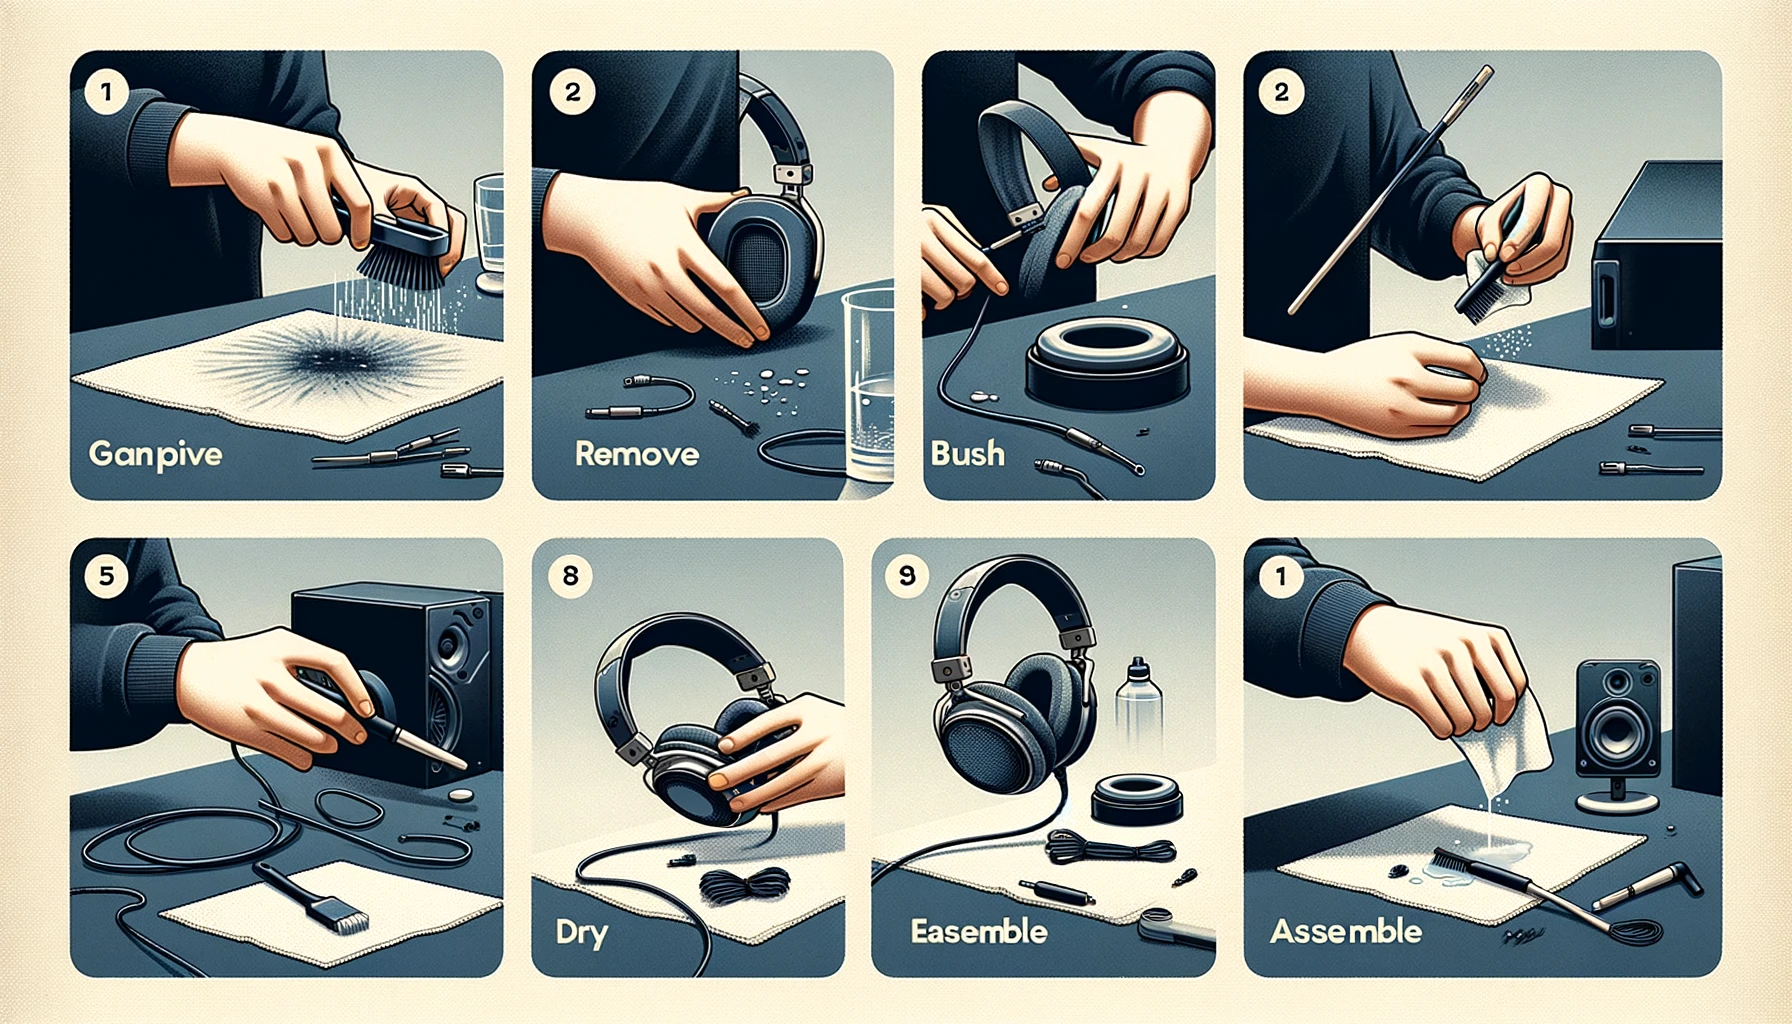
Maintaining the cleanliness of your headphones is crucial not only for hygienic purposes but also for ensuring their longevity and optimal performance. In this comprehensive guide, we explore the best practices for cleaning headphones, covering everything from daily earbuds to high-end over-ear models.
With expert advice and proven techniques, we’ll walk you through the step-by-step process of safely cleaning your audio devices, including the removal of earwax, dust, and other debris.
Whether you’re a casual listener or an audiophile, this article provides clear, neutral, and knowledgeable insights into keeping your headphones in pristine condition, thus enhancing your listening experience and protecting your investment.
Cleaning the Charging Terminals
Use a cotton swab with rubbing alcohol
To maintain the optimal performance of your headphones’ charging terminals, it’s essential to keep them clean. Dip a cotton swab in rubbing alcohol and gently rotate it over each terminal to dissolve and lift away grime. This method is effective and safe, ensuring that no damage is done to the delicate charging contacts over ear headphones.
After cleaning with a soft cloth and the alcohol-soaked swab, follow up with a dry cotton cloth. This step is crucial for removing any leftover alcohol, dust, or fibers that may have been left behind. The goal is to leave the terminals spotless and dry, ready for efficient charging.
- Step 1: Lightly moisten a cotton swab with rubbing alcohol.
- Step 2: Carefully rotate the swab over the charging terminals.
- Step 3: Wipe the area with a dry cotton cloth to remove any residue.
Regular cleaning not only preserves the functionality of your headphones but also extends their lifespan. Make this a part of your routine headphone maintenance to ensure uninterrupted, high-quality audio experiences.
Rotate the swab and scrub lightly
After lightly moistening the cotton swab with rubbing alcohol, it’s time to focus on the charging terminals. Rotate the swab gently as you scrub to ensure you’re reaching all the nooks and crannies. This rotation is crucial for dislodging any stubborn debris without applying excessive force that could damage the delicate components.
Proceed with care, using the following steps:
- Rotate the cotton swab in a circular motion over the charging terminals.
- Apply minimal pressure to avoid harming the terminals.
- Focus on areas with visible dirt or residue, but ensure even cleaning across all terminals.
Once you’ve thoroughly scrubbed the terminals, inspect them to make sure no fibers from the cotton swab have been left behind. If any residue remains, repeat the process until the whole pair of terminals are clean. Remember, patience is key to effective cleaning without causing damage.
Use a cotton cloth to remove dust and residue
After using a cotton swab with rubbing alcohol and rotating it to scrub the headphone jack terminals lightly, it’s crucial to remove any remaining dust and residue. Gently wipe the area with a microfiber cloth to ensure that no particles are left behind. This step not only maintains the cleanliness of your headphones but also ensures optimal charging efficiency.
To prevent potential damage to your headphones, adhere to the following guidelines:
- Use only a soft, lint-free cloth.
- Avoid excessive wiping, which might cause damage.
- Ensure that no moisture enters any openings.
Finish with a dry microfiber cloth to remove moisture and polish the surfaces to a shine. Remember, a little preparation goes a long way in ensuring a sparkling, clean, and healthy device.
Cleaning the Earbuds and Tips
Regularly clean earwax and debris buildup
Maintaining the cleanliness of your earbuds is essential for both hygiene and performance. Regular cleaning of earwax and debris buildup on earphones both ensures optimal sound quality and prevents potential ear infections. After using a damp cloth to clean, make sure the earbuds and tips are thoroughly dried to inhibit bacterial growth.
To keep your earbuds in top condition, follow these simple steps:
- Inspect your earbuds for visible earwax or debris before and after use.
- Gently wipe the surface with a soft, dry cloth or a cloth slightly dampened with water or rubbing alcohol.
- Allow the earbuds and tips to air dry completely before storing or using them again.
Remember, the skin in your ear canal naturally produces wax which can accumulate on your earbuds. This natural process helps to protect your ears, but it also means that regular cleaning of your earbuds is necessary to maintain both your ear health and the functionality of your earbuds.
Ensure earbuds and tips are dry after cleaning
After cleaning your earbuds, it’s crucial to ensure they are thoroughly dry before use. Moisture can harbor bacteria and lead to ear infections, so take the time to dry them properly. Here’s a simple guide to follow:
- Step 1: Gently tap the earbud on a soft, dry, lint-free cloth with the ear tip opening facing downward to remove any trapped water.
- Step 2: Remove the ear tips and rinse with water only—no soaps or cleaning agents.
- Step 3: Wipe the ear tips with a lint-free cloth and let them air dry completely, or use a dry cotton swab to absorb any remaining moisture.
- Step 4: Once dry, reattach the ear tips by aligning them with the AirPods oval-shaped connector and pressing firmly until they click into place.
Ensuring your earbuds and tips are dry not only maintains hygiene but also preserves the quality of sound. Regularly rotating and replacing true wireless earbuds and tips can further enhance comfort and prevent irritation.
Rotate and replace ear tips periodically
Maintaining the cleanliness and integrity of your earbuds is essential for both hygiene and audio performance. Rotate and pull the ear tips out gently to inspect and clean them. Over time, ear tips can accumulate earwax and other debris, which can harden and affect both comfort and sound quality. Regular rotation and cleaning can prevent this buildup.
When cleaning is not enough, consider replacing the ear tips. Fresh tips can restore the original comfort and ensure a proper seal for optimal sound isolation. Here’s a simple guide to which foam ear tips to follow:
- Inspect ear tips for signs of wear or damage.
- Clean ear tips regularly with a gentle, soapy solution.
- Dry ear tips thoroughly before reattaching.
- Replace ear tips every few months or when they no longer fit snugly.
By adhering to these practices, you can extend the lifespan of your earbuds and enjoy a cleaner, healthier listening experience.
Cleaning the Digital Crown
Use a dry cotton swab to remove dirt
After using a dry cotton swab to remove visible dirt from the Digital Crown, inspect the area to ensure that all debris has been cleared. If you find persistent grime, you can gently rotate the Digital Crown while holding the swab against it to dislodge any remaining particles. This action mimics the natural movement of the crown and helps to release any dirt trapped in the mechanism.
It’s important to avoid applying too much pressure as this could damage the sensitive components of the headphones. The goal of proper cleaning is to achieve a thorough cleaning without compromising the integrity of the device. Below is a simple checklist to follow when cleaning the Digital Crown:
- Inspect the crown for visible dirt.
- Use a dry cotton swab to gently clean the surface.
- Rotate the Digital Crown with the swab applied if necessary.
- Avoid using liquids or metal objects that could cause damage.
Remember, regular maintenance can prevent the buildup of dirt on the metal charging contacts and other parts of your headphones, ensuring optimal functionality and longevity.
Avoid using liquids or metal objects
When maintaining the cleanliness of your headphones, especially the delicate components like the digital crown, it’s crucial to avoid the use of liquids and metal objects. Introducing moisture can lead to corrosion or electrical issues, while metal objects can scratch or damage the sensitive parts.
- Use only a soft, lint-free cloth for cleaning.
- Avoid excessive wiping to prevent damage.
- Ensure that no moisture enters any openings of the device.
Remember, the goal is to preserve the functionality and appearance of your headphones. Stick to gentle cleaning methods to extend the life of ear headphones and your device.
General Cleaning Tips for AirPods
Use a soft, dry, lint-free cloth to wipe the exterior
Maintaining the pristine condition of your AirPods is not just about preserving their sleek look; it’s also about ensuring their longevity and functionality. Use a soft, dry, lint-free cloth to gently wipe the exterior surfaces of your AirPods. This simple action is a little-known secret way to keep your AirPods clean and can prevent the accumulation of dust and dirt that could potentially interfere with their performance.
When cleaning, it’s important to avoid excessive wiping, which might cause damage over time. Always unplug any external power sources and cables before you start the cleaning process. Here’s a quick checklist to ensure you’re doing it right:
- Unplug all power sources and cables
- Gently wipe with a soft, lint-free cloth
- Avoid moisture in any openings
- Steer clear of aerosol sprays and harsh chemicals
If your AirPods have been exposed to substances that could cause stains or damage, such as sweat, makeup, or sunscreen, you can slightly dampen the cloth with water or isopropyl alcohol. However, make sure to dry them thoroughly with a dry cloth afterward, and be cautious not to introduce any moisture into the openings.
Avoid using sharp objects
When cleaning your AirPods, it’s crucial to avoid using sharp objects that could potentially scratch or damage the delicate components. Instead, opt for gentler alternatives that are just as effective but much safer for your device.
- Use only a soft, lint-free cloth for wiping the exterior of your AirPods.
- Avoid excessive wiping to prevent potential damage.
- Ensure that no moisture enters any openings during the cleaning process.
Remember, the goal is to maintain the integrity of your AirPods while keeping them clean. By steering clear of sharp objects and following these simple guidelines, you can help extend the life of your device.
Avoid cleaning products with harsh chemicals
When maintaining the cleanliness of your AirPods, it’s crucial to steer clear of harsh cleaning agents that could potentially damage the device. Use only a soft, lint-free cloth for wiping down the exterior of your AirPods to avoid scratches or other damage. Excessive wiping can lead to wear, so it’s important to be gentle during the cleaning process.
It’s also essential to keep your AirPods dry. Ensure that no moisture enters any openings and that liquids are kept at bay. If you find that your headphones have developed an unpleasant odor, such as a sweat smell, a mild soap solution with a damp cloth may be used for wiping them down. However, make sure to avoid any cleaning products that contain alcohol, bleach, hydrogen peroxide, or other aggressive chemicals, as these substances can corrode the metal contacts and damage the plastic casing or rubber ear tips.
Here’s a quick checklist to help you remember what to avoid:
- Abrasive cloths or paper towels
- Excessive wiping
- Moisture in openings
- Aerosol sprays, bleaches, or abrasives
- Direct application of cleaners onto the device
Conclusion
In conclusion, maintaining the cleanliness of your headphones is essential for optimal performance and longevity. By following the step-by-step guide provided in this article, you can efficiently clean your headphones and ensure they remain in good condition.
Regular cleaning of the charging terminals, earbuds, and other components will not only enhance the audio quality but also prevent the buildup of dirt and bacteria. Remember to use gentle cleaning methods, avoid harsh chemicals, and dry the components thoroughly before use. With proper care and attention, you can enjoy your headphones for a long time to come.
Frequently Asked Questions
How often should I clean the charging terminals of my headphones?
It is recommended to clean the various charging case and terminals periodically to avoid affecting the charging speed and quality. Use a cotton swab with rubbing alcohol, rotate and scrub lightly, then remove dust and residue with a cotton cloth.
Why is it important to clean earbuds and tips regularly?
Regular cleaning of earbuds and tips is crucial to prevent the buildup of earwax, oils, and debris. It helps maintain hygiene, and comfort and extends the lifespan of the earbuds. Ensure they are dry after cleaning to prevent bacterial growth.
How should I clean the digital crown of my headphones?
To clean the digital crown, use a dry cotton swab to gently remove dirt and debris. Avoid using liquids or metal objects that can damage the mechanism or coating of the crown.
What are some general cleaning tips for AirPods?
Use a soft, dry, lint-free cloth to wipe the exterior of AirPods. Avoid using sharp objects or cleaning products with harsh chemicals that can damage the metal contacts, ear pads, plastic casing, or rubber ear tips.
How do I clean the ear cushions of AirPods Max?
To clean the ear cushions of AirPods Max, gently remove them and wash them with mild soap and water. Let them dry completely before re-attaching. Align the magnets and press firmly to snap into place.
What are the key do’s and don’ts for cleaning AirPods?
Do use a soft, dry, lint-free cloth to clean the exterior of AirPods. Don’t use sharp objects, liquids, or harsh chemicals. Follow specific cleaning instructions for each part to maintain the quality and longevity of your AirPods.